
I’m going to explain how to migrate from Blogger to WordPress in 5 steps. And I am going to migrate a blog that I have as a test so that you can see how it is done step by step with great detail.
1. Export everything from Blogger
Be careful, when talking about migrating Blogger, it always refers to the content, not the design you have on your website, because Blogger uses its own templates or Themes. It is true that some are similar to those that you can later use in WordPress and you can leave it almost the same, but not all.
Although in those cases it is as simple as choosing another template from among the thousands that exist and leaving it to your liking.
The first thing is to export everything that your blog has created in Blogger to have a backup, just in case. I’m going to do it with the blog example.blogspot.com, which I have simply for tests that I usually do.
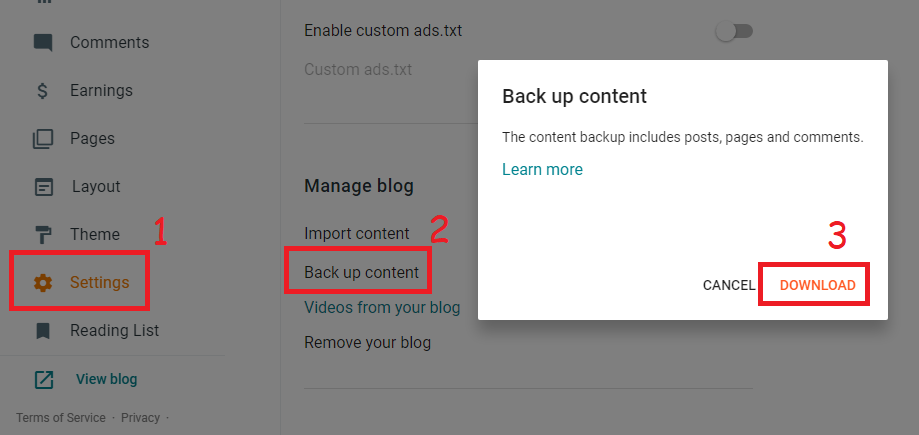
1) Within the control panel of your blog in Blogger, in the menu on the left click on Settings and look for the Manage blog section. There you have to click on Back up content.
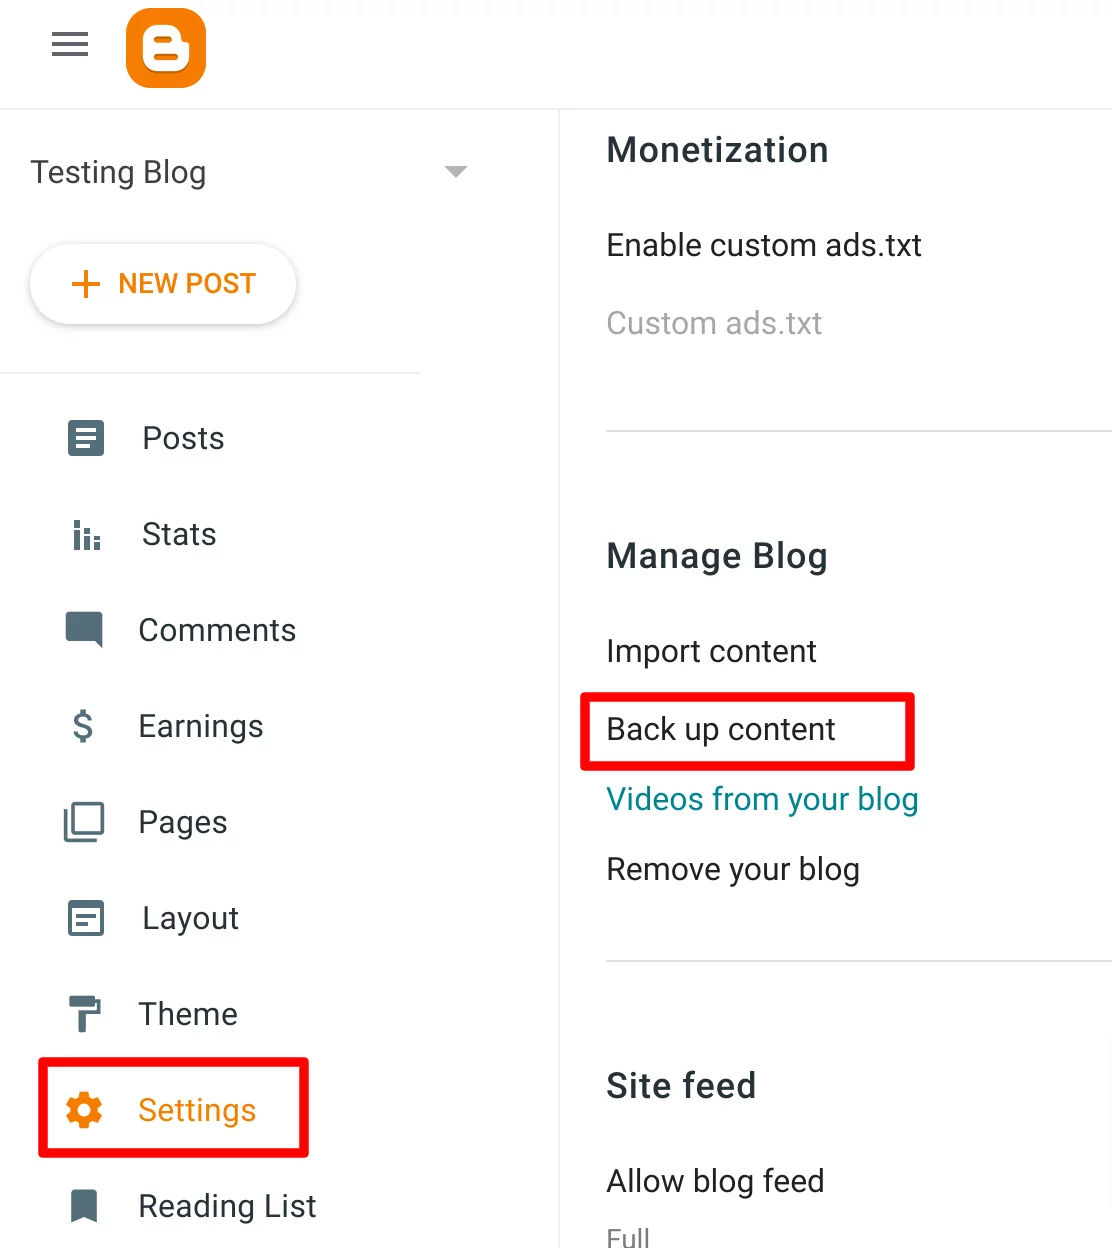
A message will appear showing what the backup contains. Click Download.
2) It will take more or less depending on the number of articles you have on your blog. When it finishes, you will see that it downloads an XML file with all the data and URLs that you can save on your PC as a backup.
2. Hire a hosting for WordPress
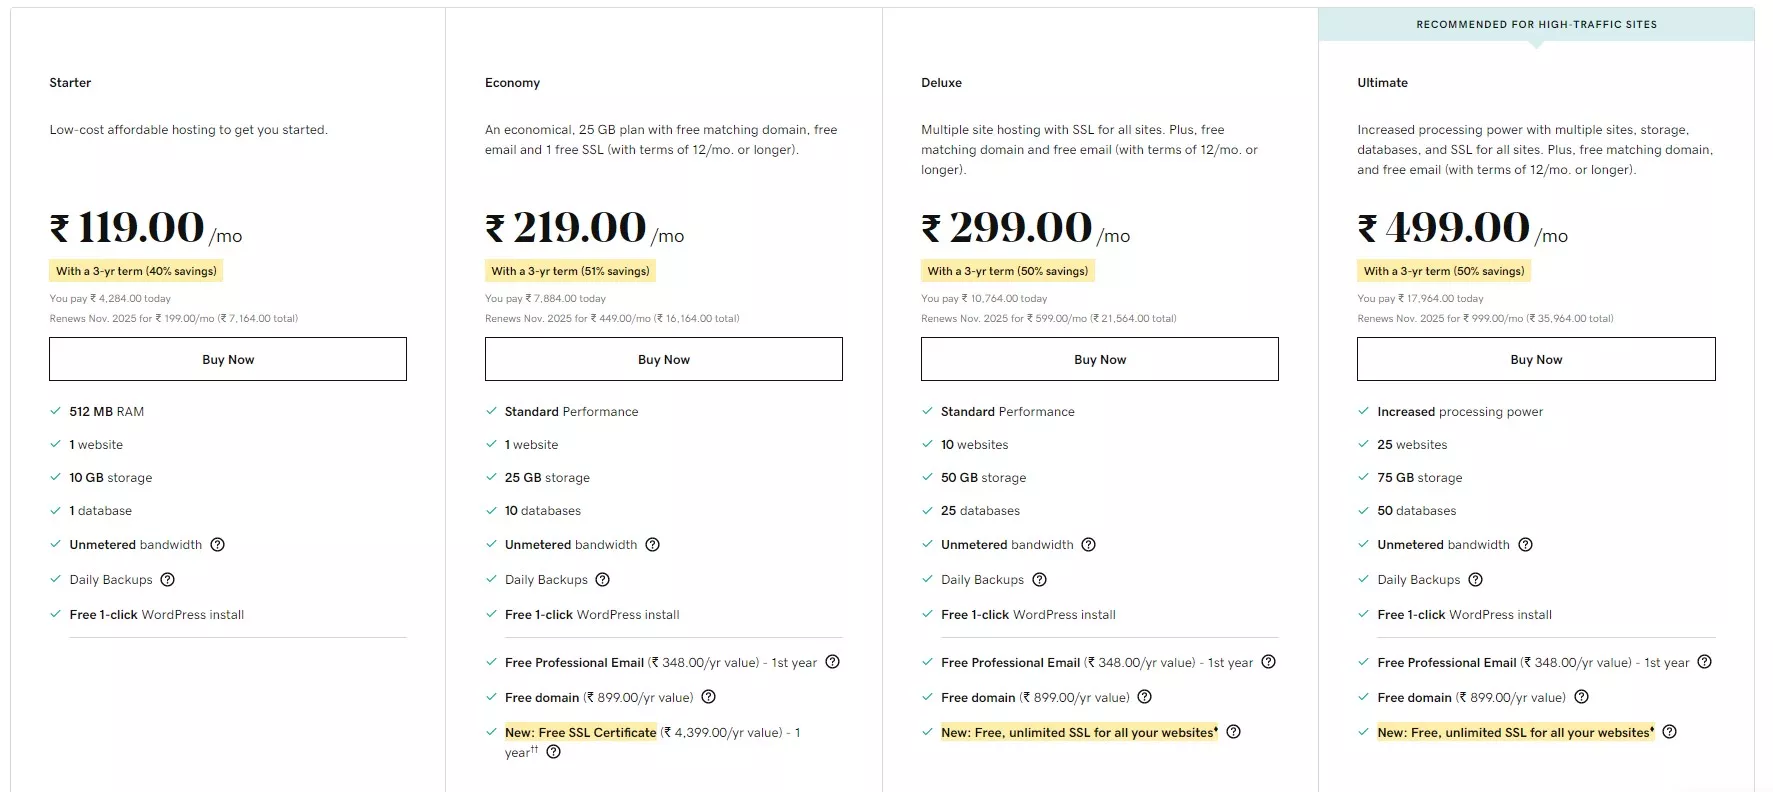
Now the next thing is to contract hosting, which is the web hosting where your WordPress will be installed, so it is yours that it be a specialized WordPress hosting.
So I am going to explain step by step how to contract hosting with them as an example.
1) If your blog is relatively new or does not have many visits, you can easily choose a “basic” plan such as Home Hosting or Base Hosting.
If you do not have your own domain, you can buy a new one.
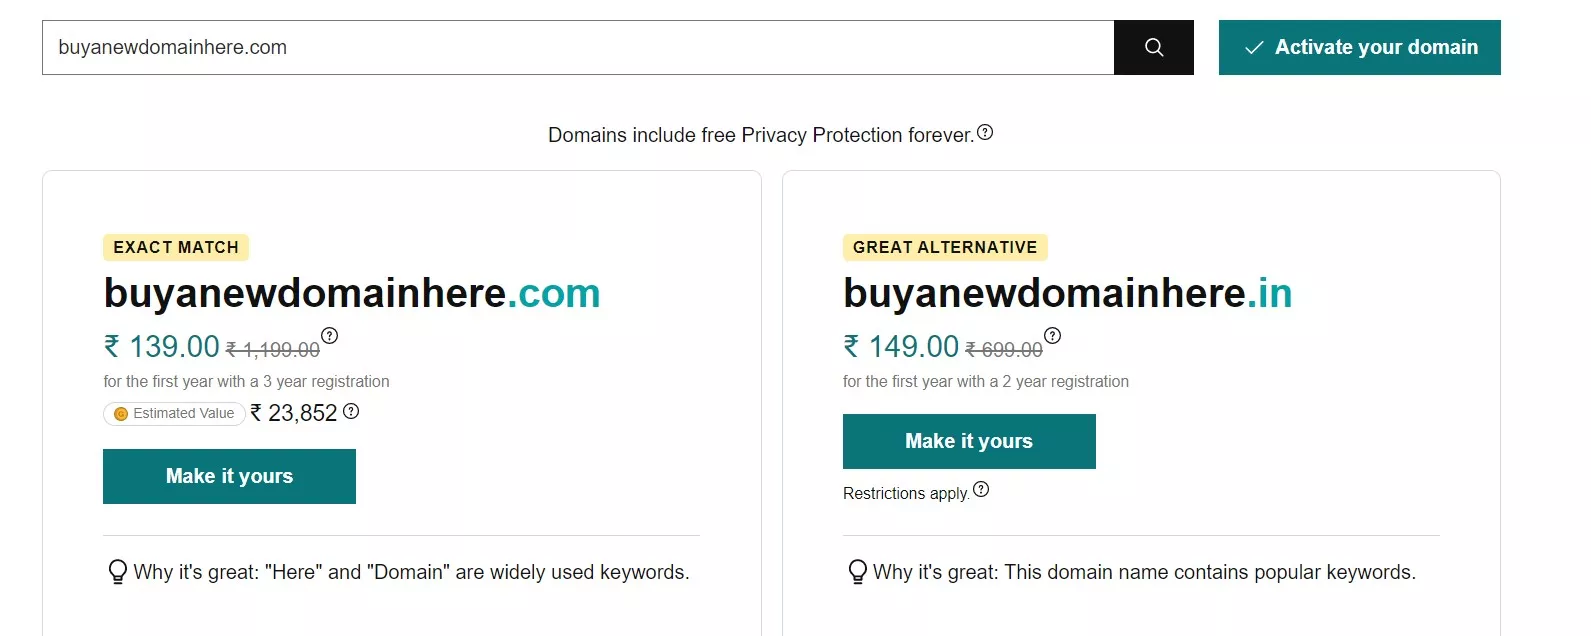
Don’t worry, I’ll explain later how to redirect your Blogger URLs to the URLs of your new domain so that they go to the same content.
If you already have your own domain set up on your Blogger, you can transfer it to your new hosting if you want.
3) In this step, it simply asks you to choose the months you want to hire the hosting and also if you want to install a CMS or content manager like WordPress.
Choose WordPress to have it installed by default and click Continue.
4) The next thing that it asks you for is your personal data for the domain.
And optionally, with .com domains you can select ID Protection so that this data is private if someone searches who has registered the domain.
Fill in your details and click Continue.
Finally, it will ask you to fill in your information and payment method. You can use bank transfer, credit card, direct debit or PayPal.
Click the blue Complete Order button.
Once you make the payment, you will receive emails confirming the purchase, the access data to your new hosting and the WordPress installation.
3. Install WordPress on your hosting
1) Enter the cPanel or control panel of your hosting, go to the Web Applications section.
Here you will see WordPress when you have it installed and you can also install a new WordPress.
2) This Installation is the tool that is normally used in almost all hosting to install WordPress in a few clicks. Check the below video for how to install WordPress
3) WordPress is already installed. Now you have to check if you have the SSL certificate configured and that when you enter the http version of your site, it automatically redirects you to the http S version (with SSL certificate and the padlock appears in the web browser as it is a secure blog). Contact host providers to activate SSL for your website.
4. Import everything to WordPress
Ok, so now comes the fun of all this, which is to import all the content of your blog in Blogger to the new and precious WordPress of your hosting (which is a WordPress.org).
1) The first thing is to leave your newly installed WordPress very clean, that is, without the typical pages, posts (entries) or comments that come to you as an example.
2) Once you have it cleaner than the bank checking account at the end of the month, go to the WordPress menu Settings > Permalinks and select the Post Name type, which is the clearest URL format for the user and for Google (for SEO).
3) Now you have to install a plugin in your WordPress called Blogger Importer Extended to import all the content of your Blogger correctly: entries (posts), pages, images, comments, users, etc.
From the Plugins > Add New WordPress menu you can search for it, install it and activate it.
4) Once activated, you see the WordPress Tools > Blogger Importer menu.
Now it asks you to enter the ID of your blog in Blogger.
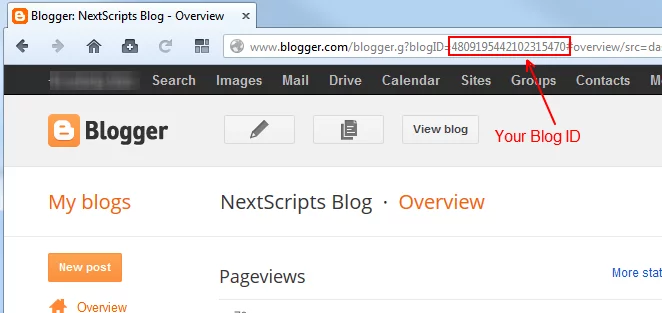
How to know the ID of your Blogger? Well, very simple, you will see it by entering the control panel of your Blogger, it is the number that appears at the end of the URL.
Once you have it, put it in and click the Submit button.
5) Now yes, the plugin already has everything it needs to connect to your Blogger and import the content directly.
You can choose if you don’t want to import something (images, comments, authors…) and it also gives you the option to convert the content into the format used by the new WordPress editor called Gutenberg, with which you can easily edit posts with “blocks”.
Click the Start import!
You will see a window with the percentage of the process that has been completed (it will take more or less depending on the number of posts you have to import, of course) and finally you will see this screen when everything has finished correctly.
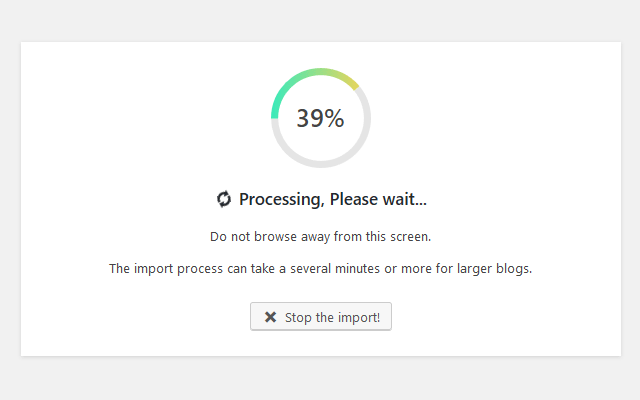
Click Return to dashboard.
6) Finally, you have to check that everything has been imported correctly.
It is best to open a browser tab with your Blogger blog and another tab with your newly imported WordPress.
Check that everything has been imported correctly: post, pages, labels, images, comments, etc.
In Blogger there are no categories, but in WordPress yes, that’s why you will see that your posts will have been imported to the Uncategorized (or Uncategorized) category by default. If you want to organize your posts into categories (just like you did in Blogger with tags), you can easily create them from the WordPress Posts > Categories menu.
And then from Entries > All Entries you can assign the categories you want to several posts at the same time in 4 easy steps:
- You choose the posts that you want to belong to a category.
- Choose the Edit option and click the Apply button.
- Check the category you want them to have (the one you created before).
- Click the Update button.
You also have to review the authors that you have imported in the Users > All users menu, which, as you will see, creates them with the Blogger author ID, although it publicly shows the name correctly (and you can edit the user to change the name if you want).
If you prefer, from Entries > All Entries you can also assign the author you want to several posts at the same time in 4 easy steps:
- You choose the posts you want to belong to the author.
- Choose the Edit option and click the Apply button.
- Choose the author you want them to have (for example your WordPress user).
- Click the Update button.
5. Redirect all URLs
Well, now comes one of the most important parts of the migration, especially if your blog already has visits, if it is positioned in the results of some Google searches or even if other websites link to your blog (which is usually good). Because the idea in this step is not to lose this traffic or the SEO of your blog.
Here the Blogger Importer Extended plugin is again very useful because, in addition to importing the content, it has 2 more steps that take care of this precisely from the Settings > Blogger Importer menu.
a) Redirection of old links
In section 2. Redirect old links, activate the Redirect old Blogger links option so that any links that your WordPress blog has that continue to use the old URL “format” that Blogger used, are correctly redirected to the new WordPress format.
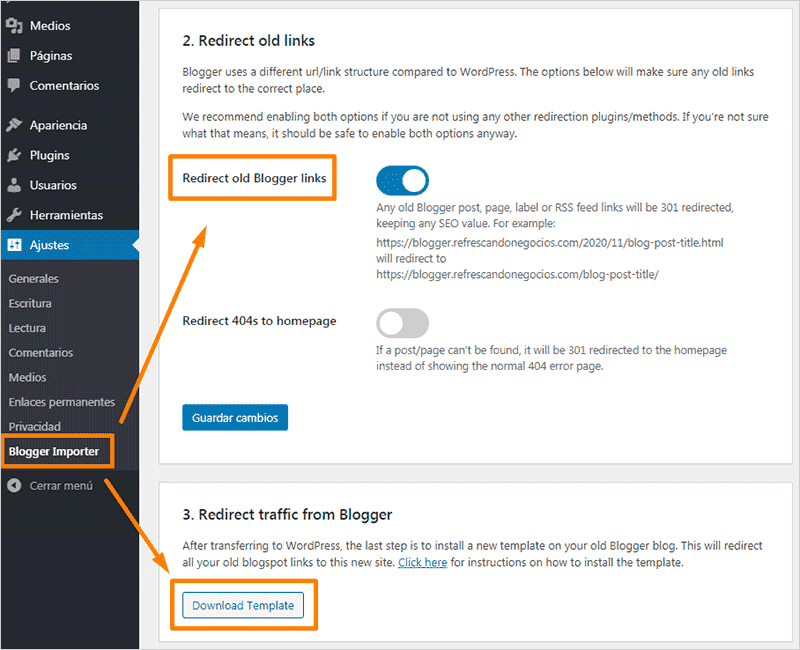
As you can see, the Redirect 404s to homepage option is not activated. What this option does is that if a “broken” link is found (to a post or page that it cannot find) it automatically takes you to the home page of your blog, but personally I prefer to know which pages are the ones that fail (for example with Google Search Console ) to try to “fix” them in another way.
For example, redirect it to another post or page that is more related to the blog home page.
b) Traffic redirection from Blogger
This step is very important so that you continue to receive the visits that came to your Blogger, and also to maintain the web positioning of your blog. But don’t worry, you will see that it is as simple as changing the “Theme” or template of your Blogger. 👍
1) In section 3. Redirect traffic from Blogger, click on the Download Template button and it will download the file called blogger-redirect-template.xml, which is the template that you must put in your Blogger.
2) In the control panel of your Blogger go to the Theme menu, click on the little arrow of the orange Customize button so that more options appear and click on the Restore button.
3) Now you will see a message for you to upload the theme file. Click Upload.
Then choose the blogger-redirect-template.xml file you downloaded and upload it.
4) You will see that it doesn’t take long to do it and a message will appear (and disappear) at the bottom left advising that the Theme has been restored correctly.
5) So that the mobile version of your Blogger also redirects to your WordPress without problem, you need to configure that the same template is displayed in both mobile and desktop versions. To do so, in the Theme menu, click the orange Customize button arrow and click Mobile Settings.
Choose the Computer option and click Save. And you will already have the template that you have uploaded before configured so that it is also loaded in the mobile version (and automatically makes the redirection).
The magic is already done, because if you try to enter your blog in Blogger it will automatically redirect you to your blog in WordPress.
If you look closely, the article is the same and what changes is the URL and the domain.
Still, test that everything works fine.
Enter the control panel of your Blogger and check that when you click on the View blog and View option of your posts and pages, they are effectively redirected to the URLs that correspond to them in your WordPress.
Conclusion
You see that migrating a Blogger to a WordPress hosted on a hosting is not that complicated if all the steps are followed well, and especially with the Blogger Importer Extended plugin.
If it is a new or recent blog that has not yet been visited or ranked in Google, then do it without fear.
But if it is a blog that is already years old and above all that generates income, perhaps it is not worth getting into trouble on your own and risking losing visits or web positioning; In that case, the best thing to do is to have a professional who already has know to do this type of migration, really.
As the driving force behind WikiPluck, I am dedicated to curating and sharing insightful knowledge across a spectrum of subjects. From technology trends to Business advice, WikiPluck strives to be a go-to resource for those seeking to enhance their understanding and make informed decisions.
Join me on this journey of discovery and enlightenment as we pluck the gems of wisdom from the vast landscape of knowledge.